Tutorial  


Audacity Audio Editing Software


About Audacity

Audacity is a free, open source, multi-track audio editing platform. It can be used to import, edit and export many audio file types, including: WAV, AIFF, MP3, AU, and FLAC. It also supports the import of audio files from video files including Opus, AC3, M4A/M4R (AAC) and WMA formats.

Audacity can also be used to record digital audio tracks using your computer, providing you have an internal or external microphone.

Audacity is compatible with both Windows and Mac operating systems.

It’s built-in accessibility features include full editing ability using a keyboard, keyboard shortcuts, and Windows screenreader and Mac Voice Over compatibility.

This tutorial is a brief overview of commonly used tools and functions. If you need more information, you can find the complete Audacity Manual online.

Transport Toolbar


The Transport Toolbar contains playback tools that are similar to most other media players including:

  • Pause
  • Play
  • Stop
  • Skip to Start
  • Skip to End
  • Record

To move forward and backward through the recording, you can use the “playhead.” Click and drag the green arrow at the top, or click on a point in the time line to move the playhead to the desired position.

Tools Toolbar


The Selection Tool is used to select audio. You can click in a track to position the cursor to play from, or click and drag to select a range of audio.

The Zoom Tool allows you to zoom in or out of a specific part of the audio.

The Envelope Tool gives you detailed control over how tracks fade in and out, right in the main track window. When the envelope tool is selected, the amplitude envelope of each track is highlighted in a green line, with control points at the beginning and end of each track. To change a control point, click it and drag it to a new position. To add a new point, click anywhere in the track where there is not already a control point. To remove a point, click on it and drag it outside of the track until it disappears, then release.

Tools Toolbar


The Time Shift Tool allows you to change the relative positioning of tracks relative to one another in time. To use this tool, simply click in a track and drag it to the left or right. To align two tracks together or reset their time shift back to zero, use the Align Tracks Together or Align with Zero commands.

The Draw Tool enables you to draw in to the actual waveforms. In order to use it, zoom in close enough to see individual samples of the track. The cursor will then appear as a pencil. This tool is especially useful to eliminate small pops and clicks from material. For instance ALT + click smoothes an area of audio.

The Multi Tool is all of the above tools in one. When the Multi Tool is selected one of the above tools is automatically activated by a combination of which key is pressed on the keyboard and a particular mouse movement.

Edit Toolbar


The Editing Tool Bar enables you to do basic editing to your file such as:


    • Cut: Cuts a selection to the clipboard
    • Copy: Copies a selction to the clipboard
    • Paste: Pastes a cut or copied selection in the track
    • Trim: Deletes a selection.
    • Silence: Replaces a selection with silence
    • Undo/Redo: Undoes or redoes last action
    • Zoom In/Out: Adjusts
    • Fit to selection/Fit to Width: Adjusts zoom level to fit a selection/full track within the window.
    • Zoom Toggle: Zooms between two levels, pre-set in preferences

Device Toolbars

Device Toolbar

The Device Toolbar controls how Audacity interacts with your computer’s sound card and the internal and external input and output sources available. You can also set the number of tracks here (mono or stereo).

Audio Host: Your computers soundcard. “Core Audio” is the default for Mac, and “MME” is the default for Windows.

Recording Device: The active microphone. While the default is your computer’s built in microphone, if you have an external microphone attached it will appear as an option in the dropdown.

Recording Channels: Select 1-track Mono recording, or 2-track Stereo recording. Depending on your system, two channels (L/R) will be mixed into a single channel, or it may record just one channel by default.

Mixer Toolbar

Mixer Toolbar

The mixer toolbar contains sliders that control input and output levels.

Right Slider (mic symbol): Controls the sensitivity of the input device selected in the Device Toolbar (mic symbol).

Left Slider (speaker symbol): Controls the playback volume of the Output Device (speaker symbol) selected in the Device Toolbar. If the output device is “Built in Output” this slider controls the playback volume of your computer.

Recording


To record using audacity, you can use either your computer’s built in microphone, or an external microphone (recommended). Select the desired device, and choose either mono or stereo format from the Device Toolbar.

Before you begin recording, you can test your recording levels by clicking on the Recording Level Toolbar (mic symbol). Once you click on the toolbar, you will see the level of sound being picked up by your microphone. Ensure your input level is set correctly and you are positioned well in front of your mic before you hit record. Your recording levels should be, ideally, between -12 and -6, though they will fluctuate.

To start recording, select Mono or Stereo in the Device Toolbar and then press the Record button in the Tools Toolbar.  A new window with a new track will automatically open and begin recording.

Play-Back


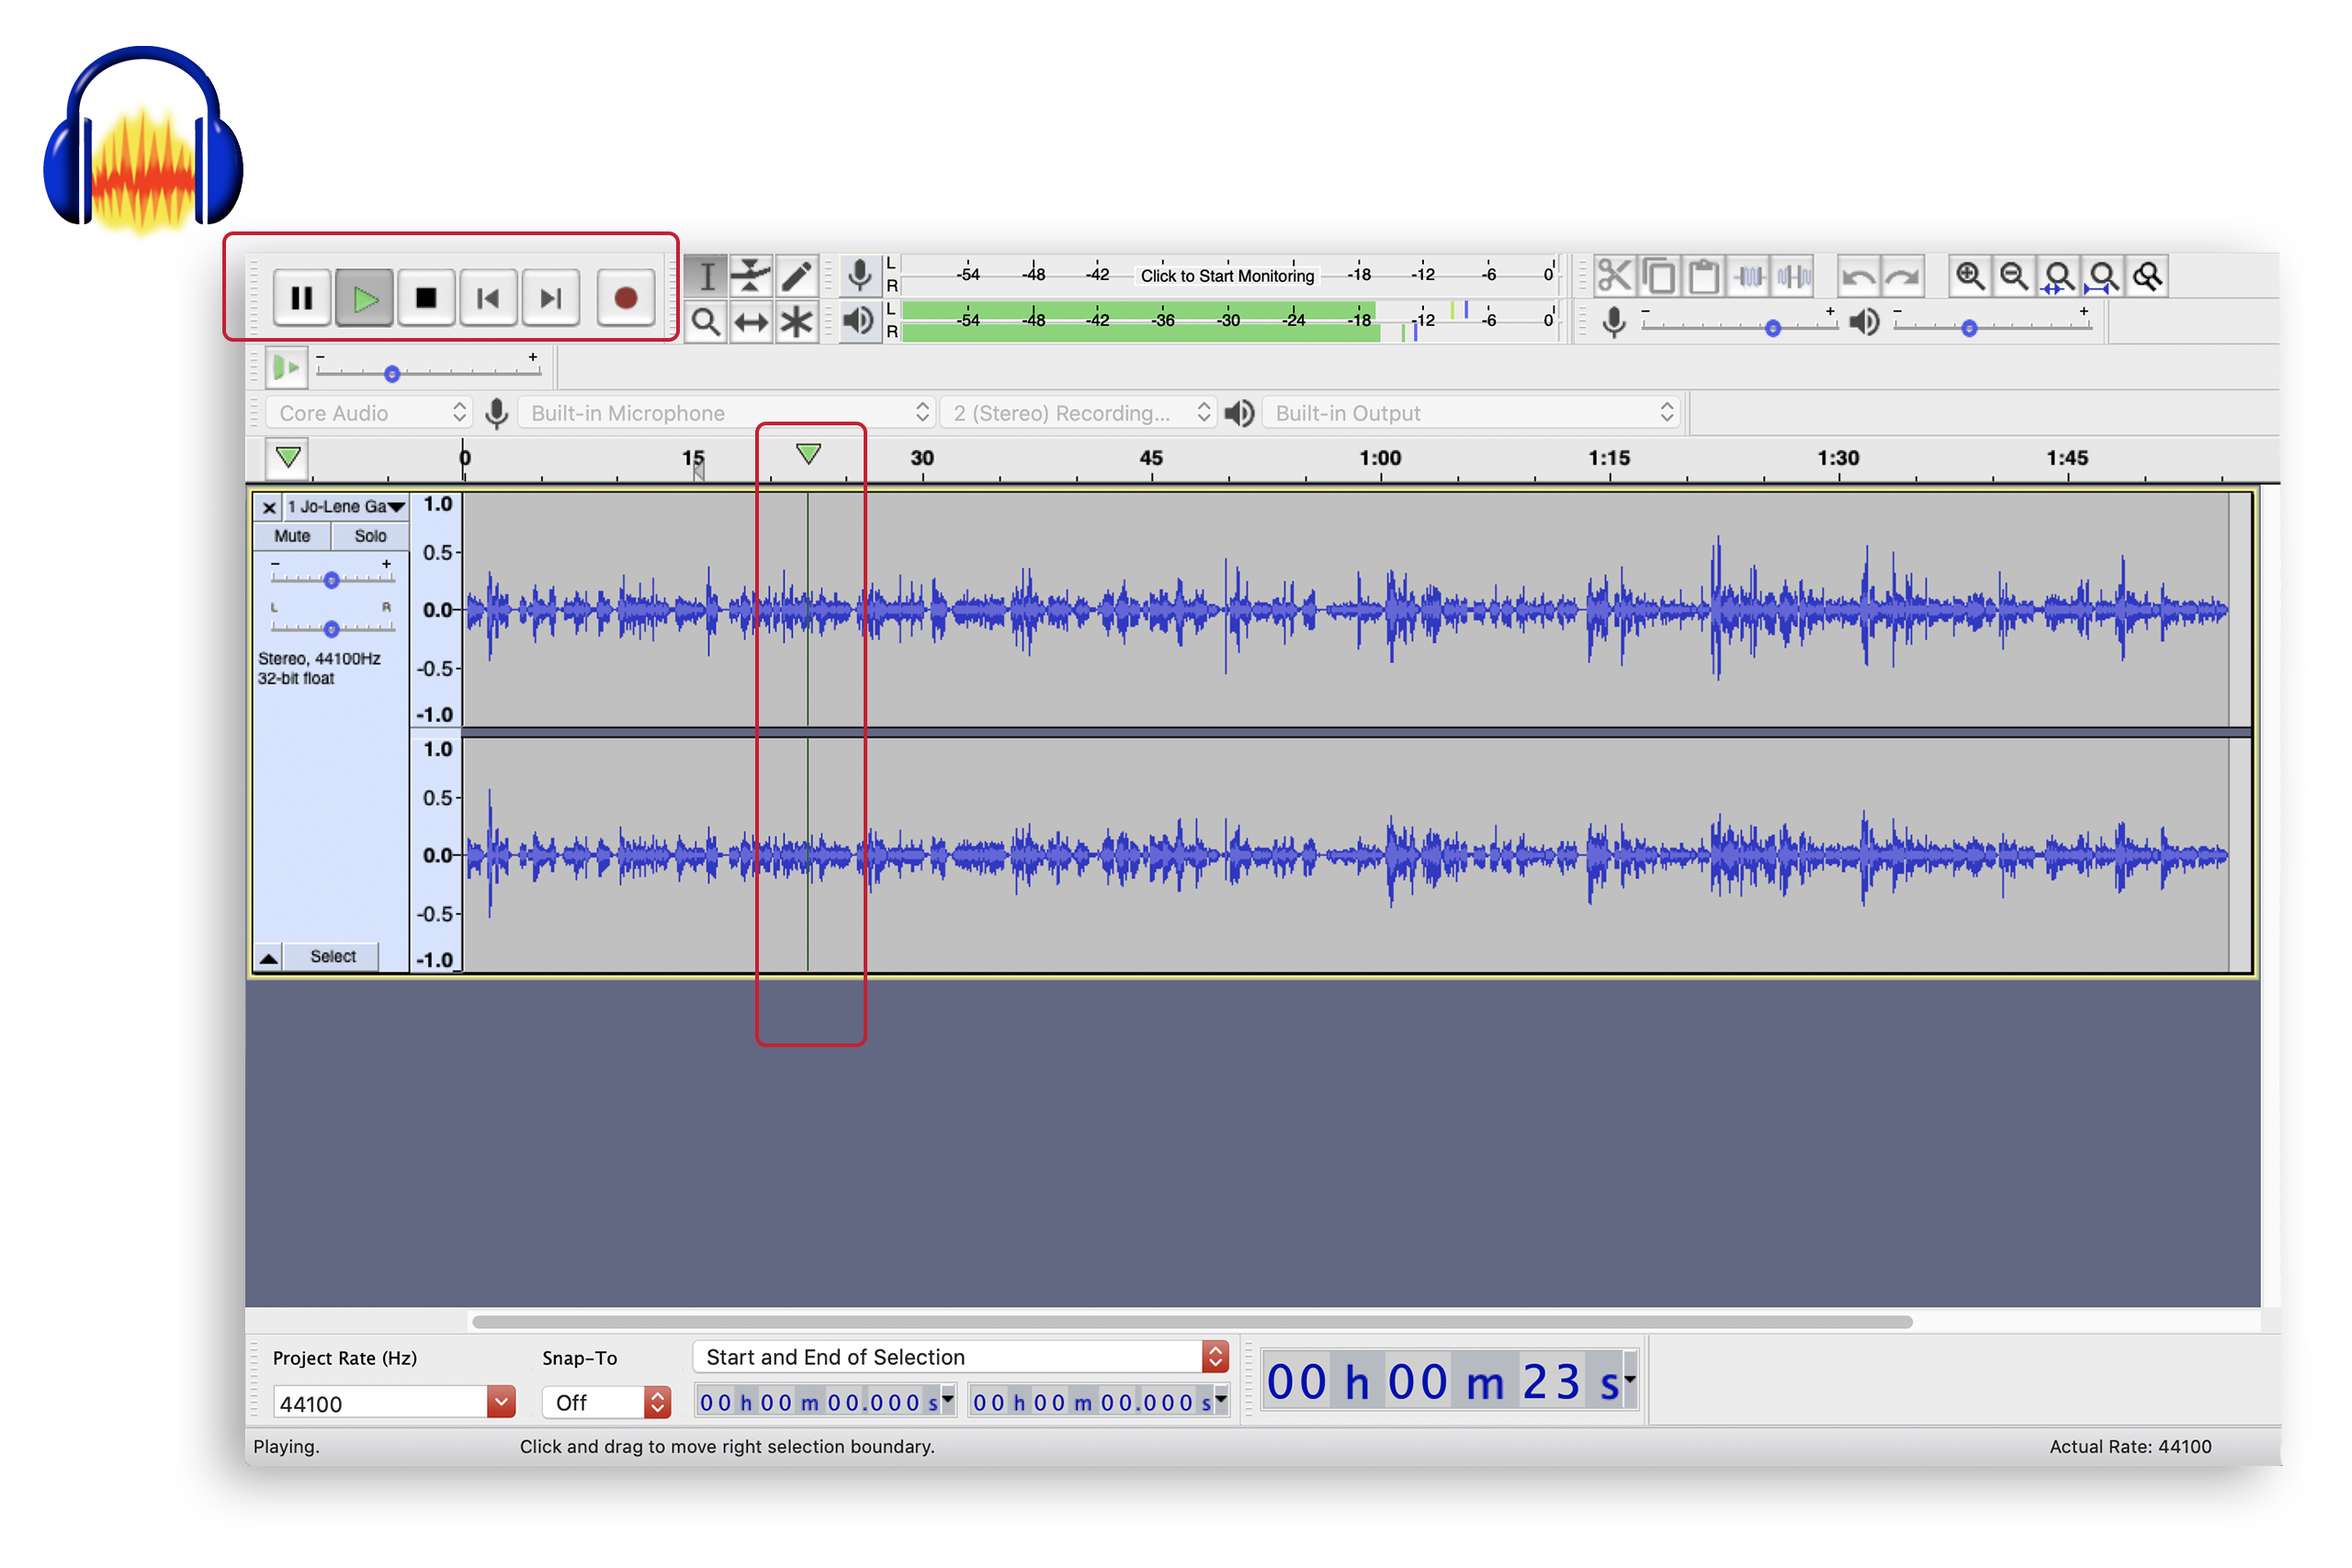
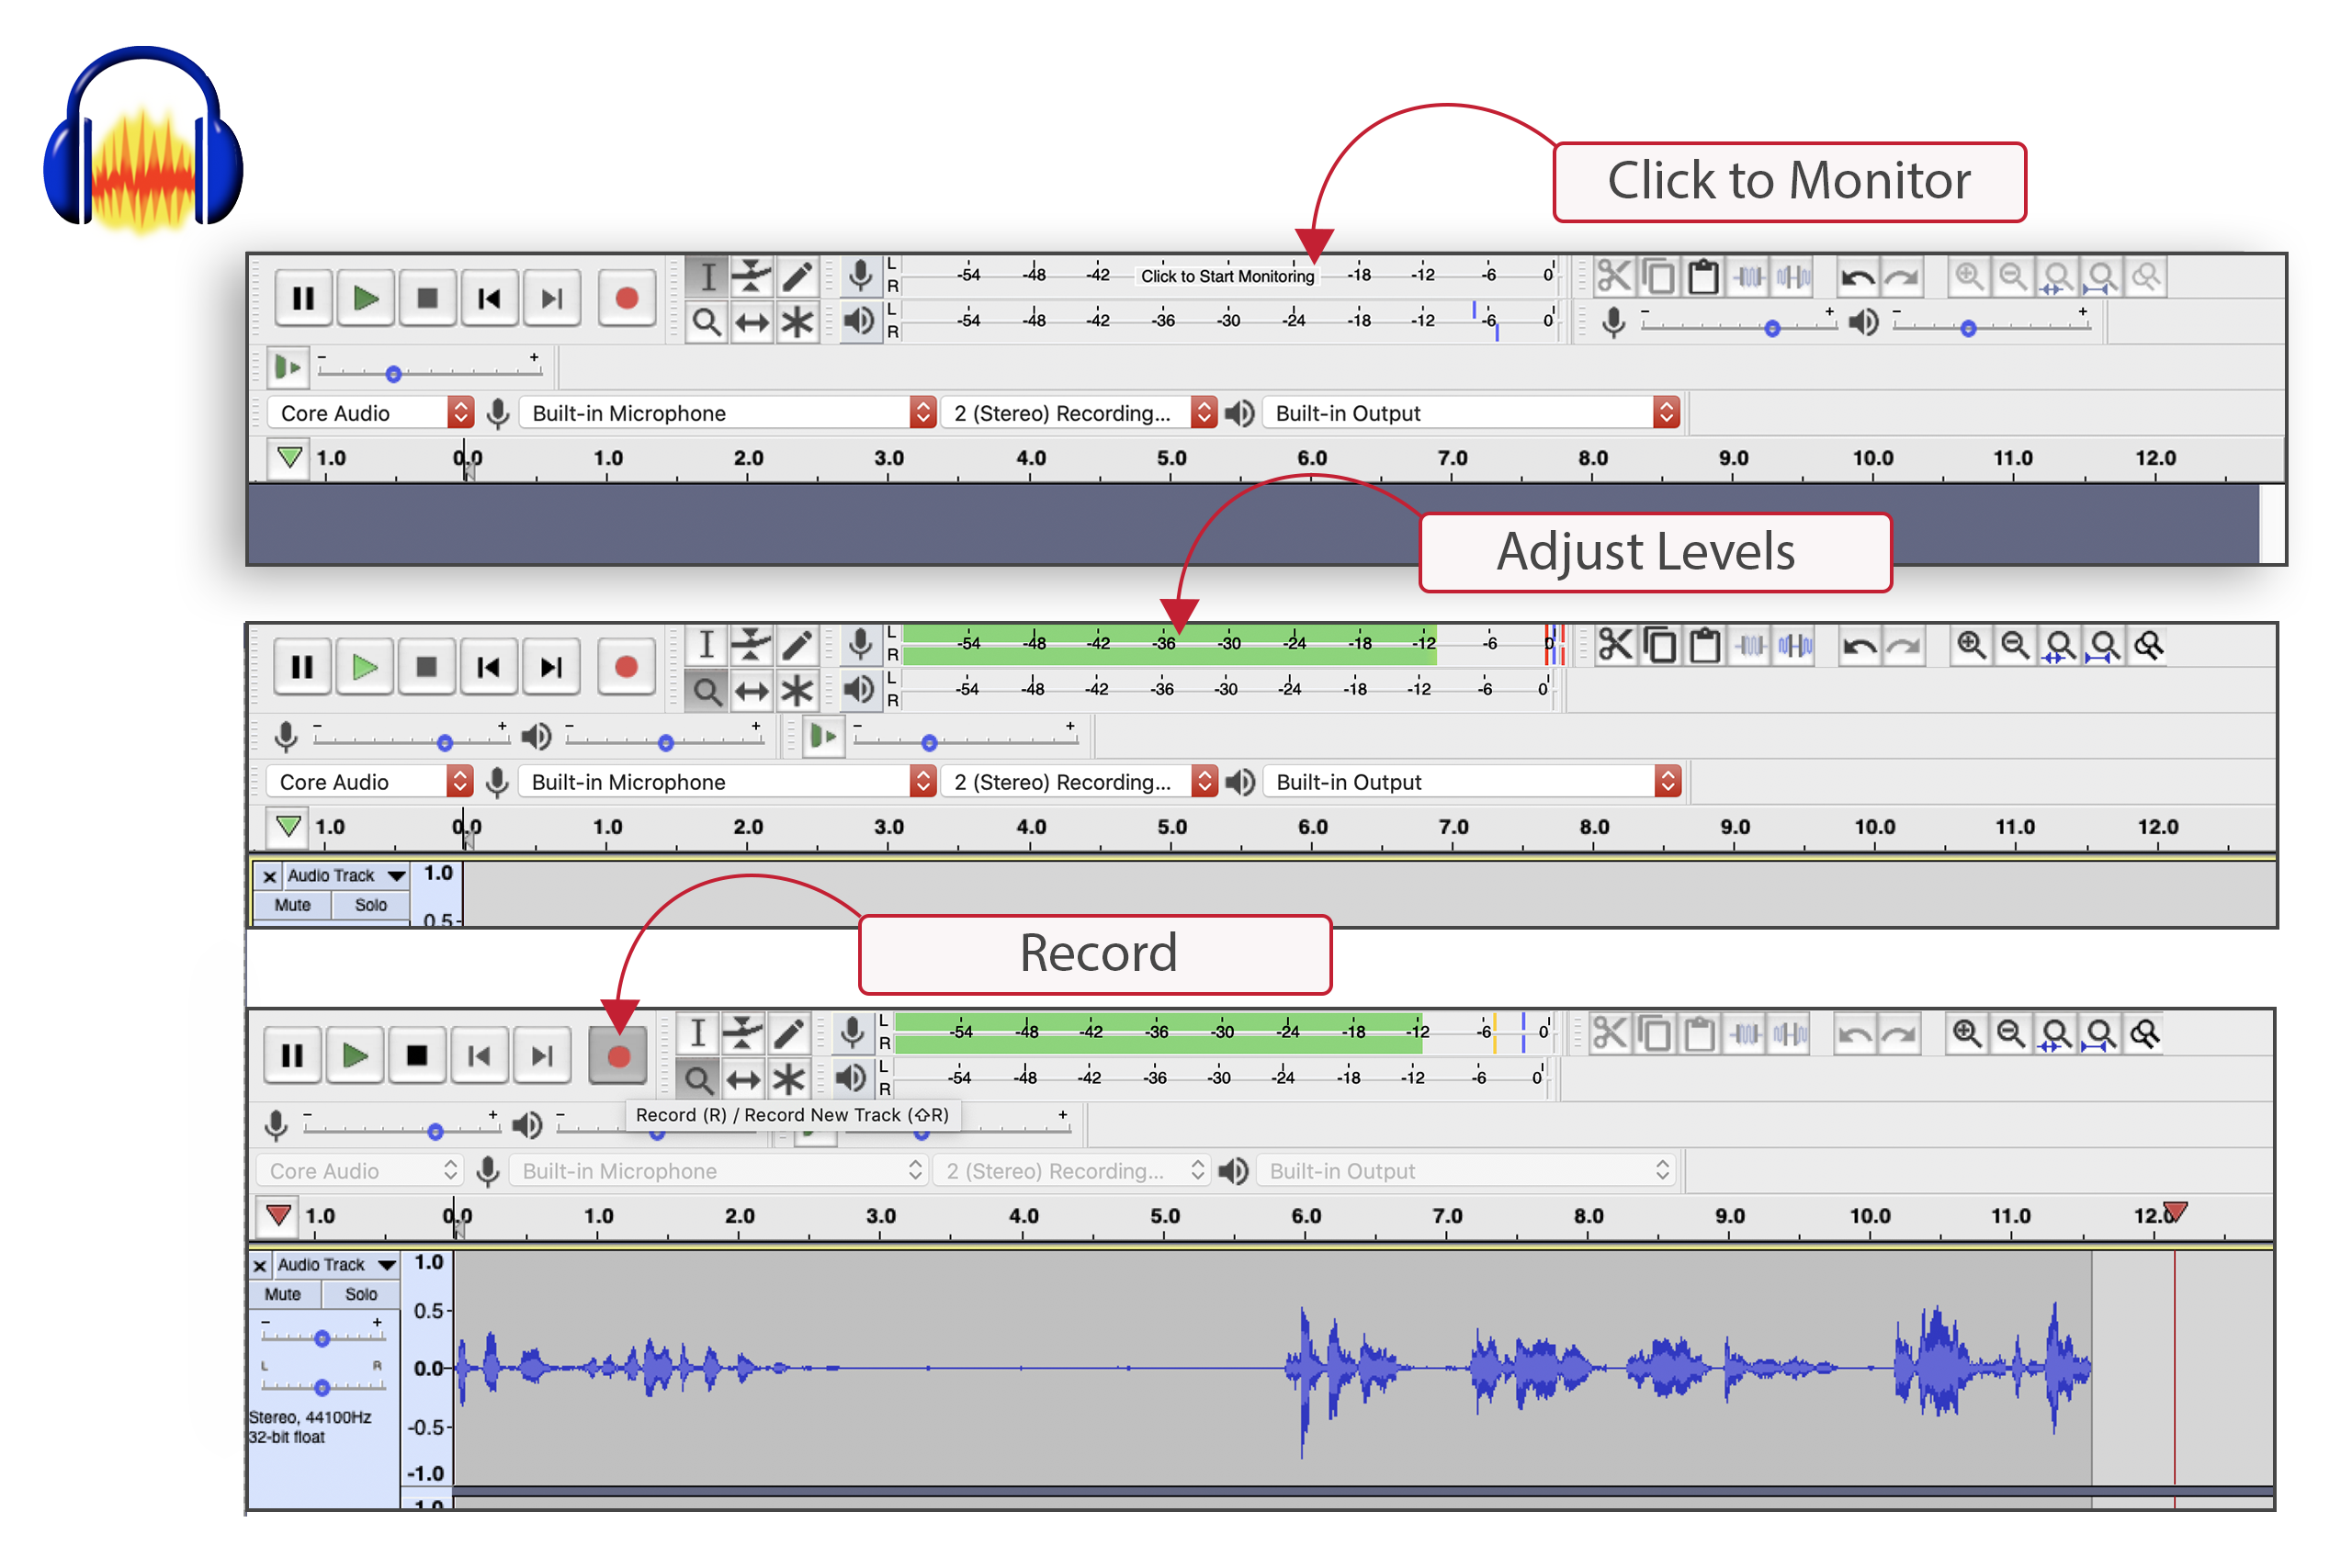
When you stop recording you can use the “Skip to Start” button to jump to the beginning and press the spacebar to play your track. You will see your recording levels reflected in the Playback Meter Toolbar (speaker symbol) now.


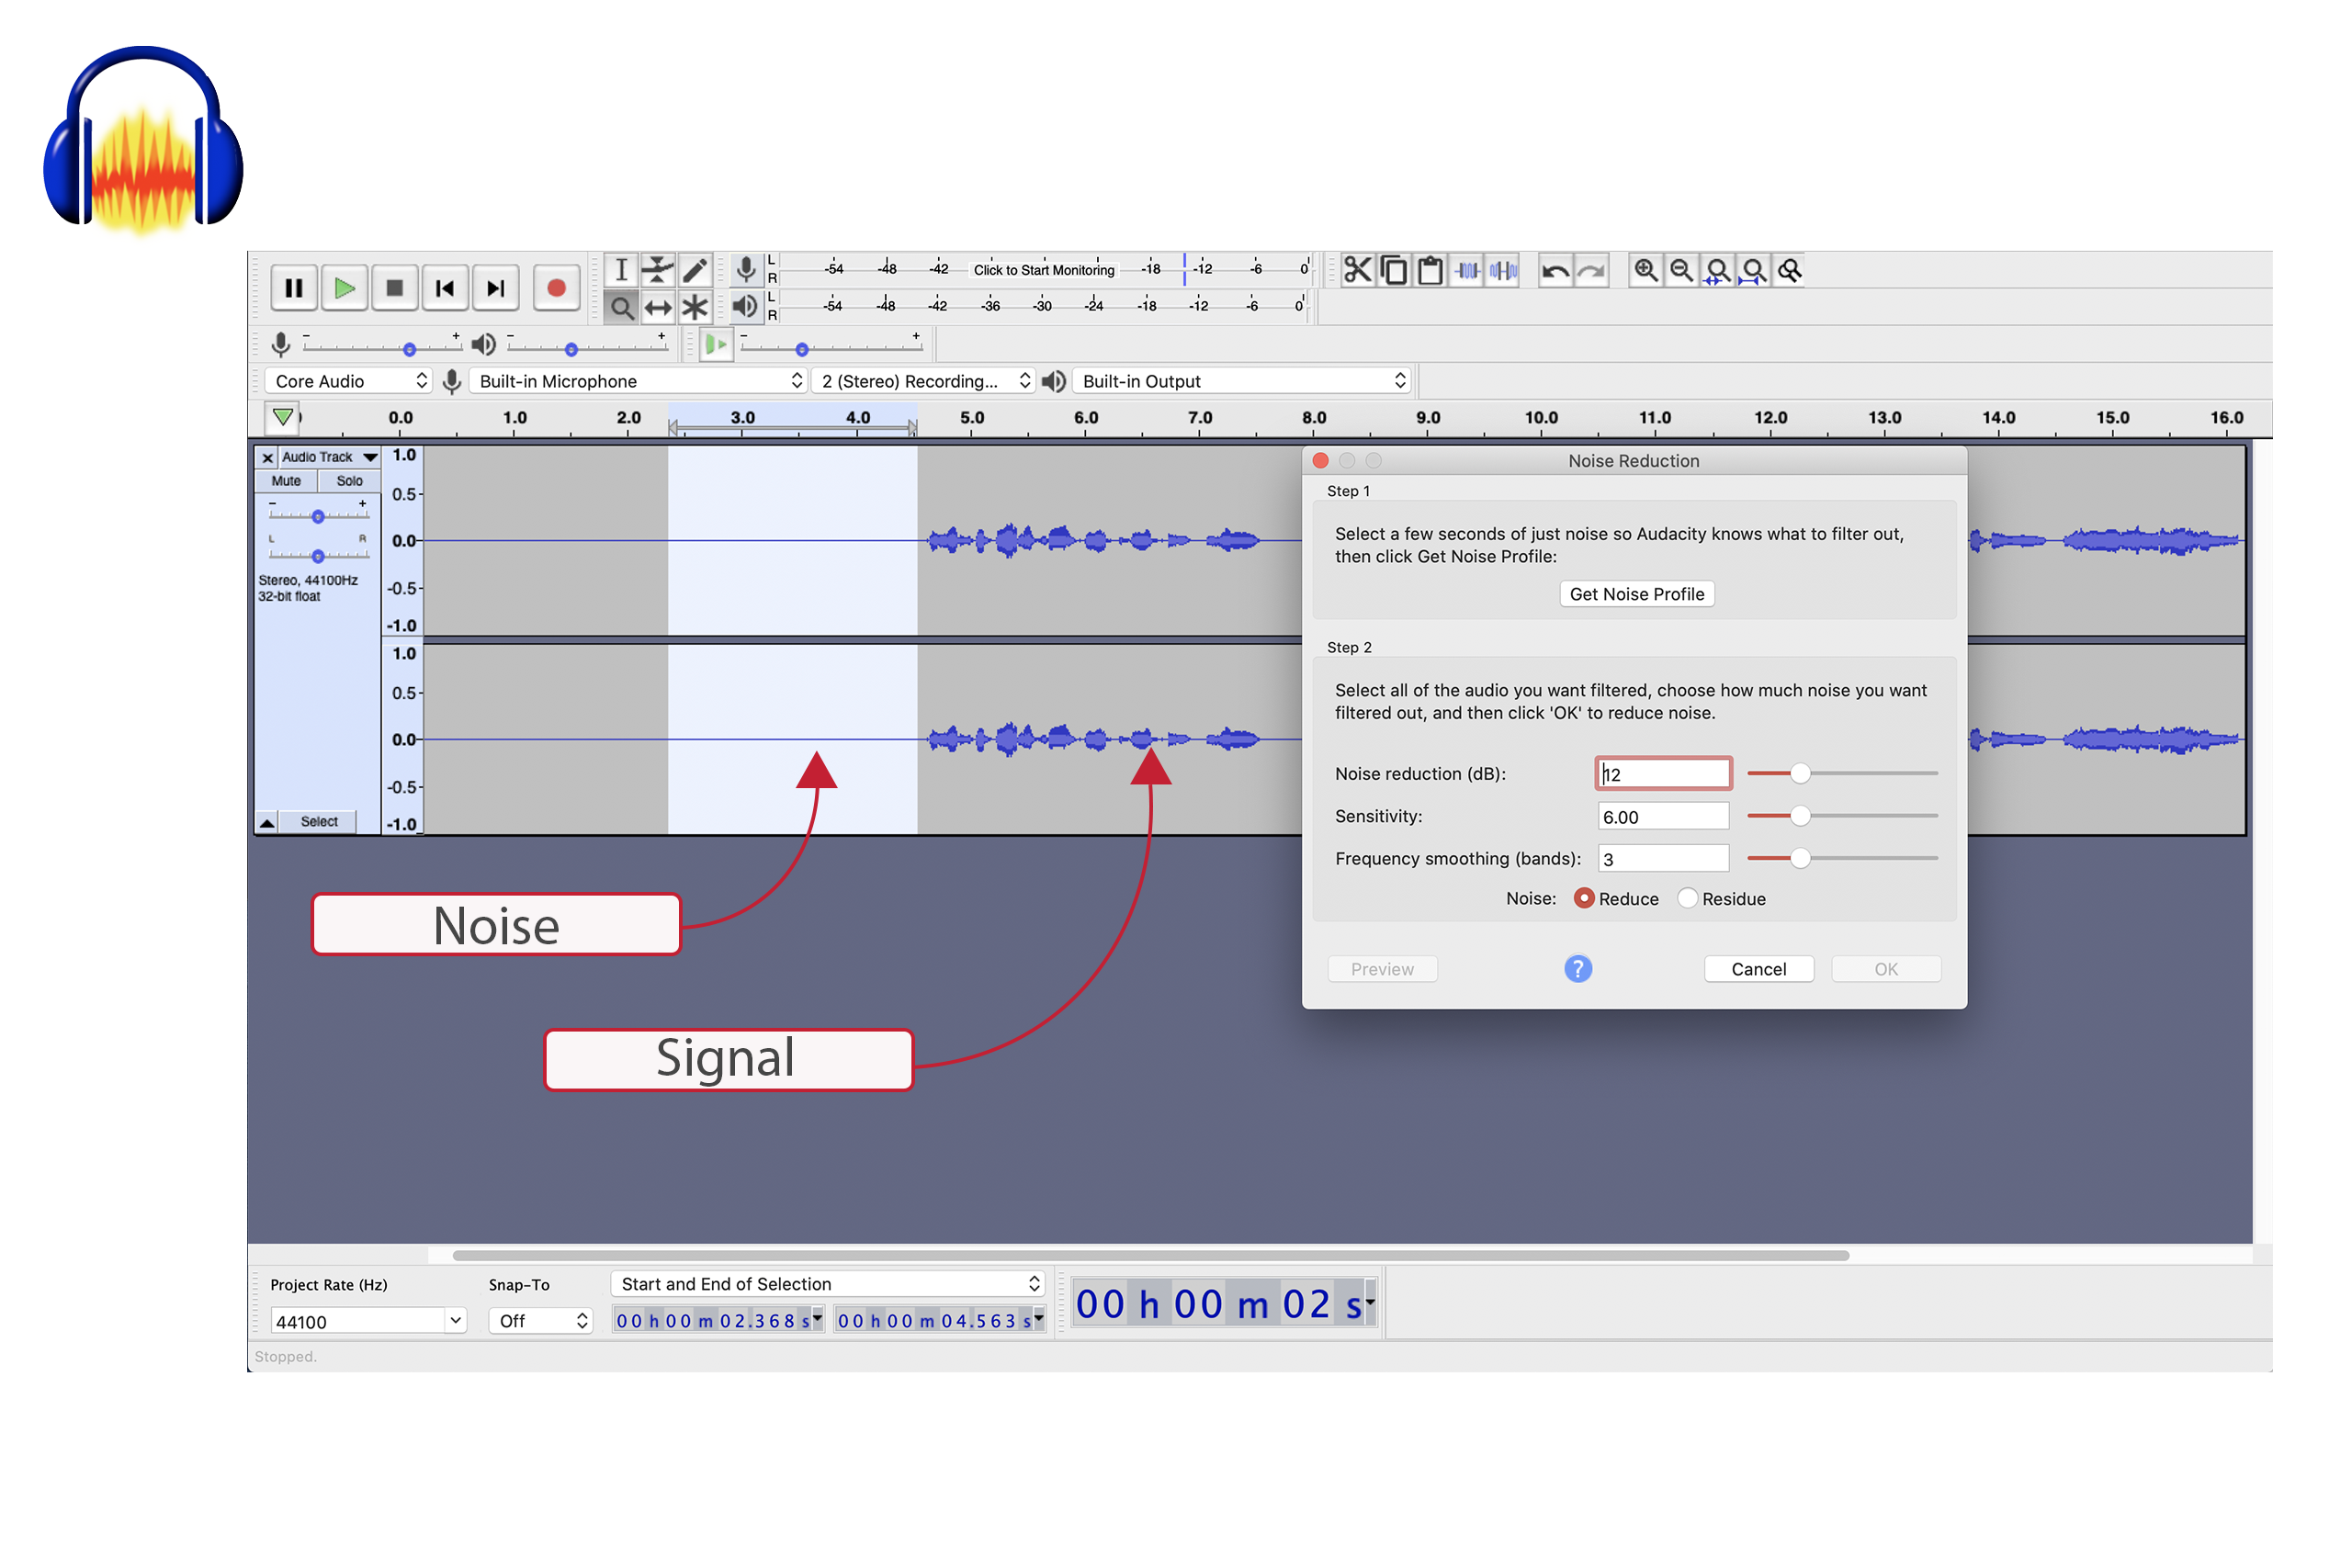
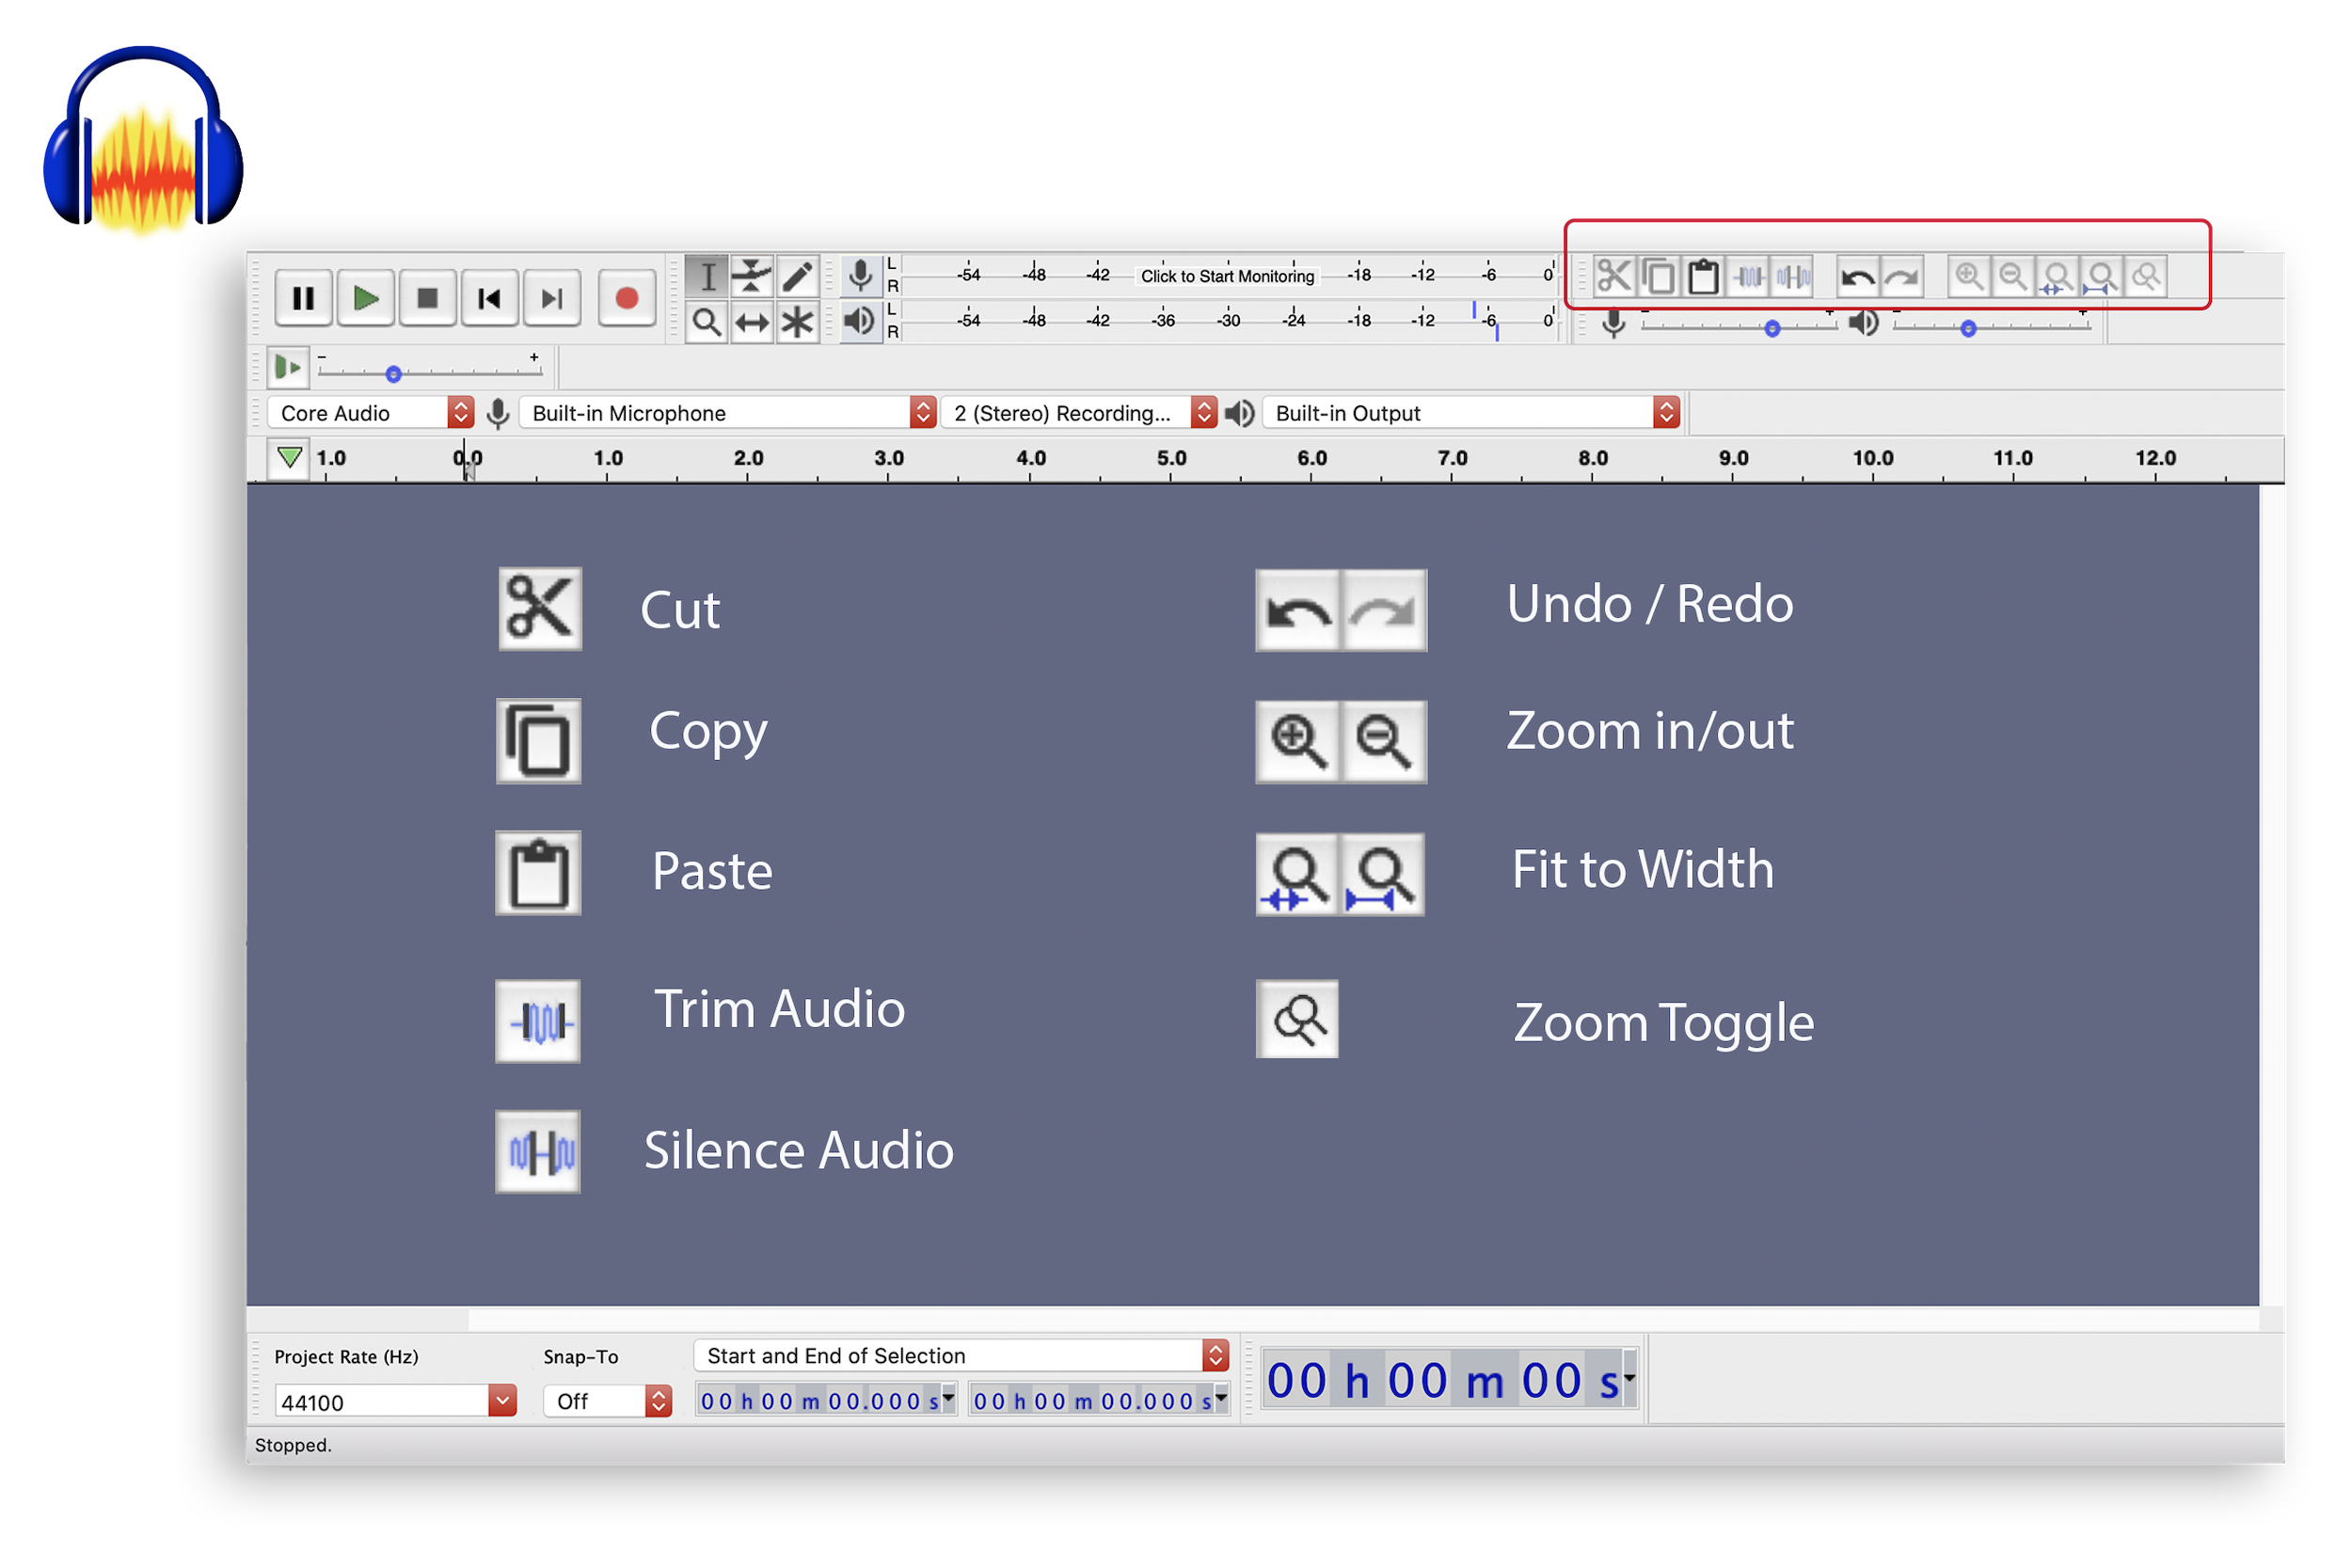
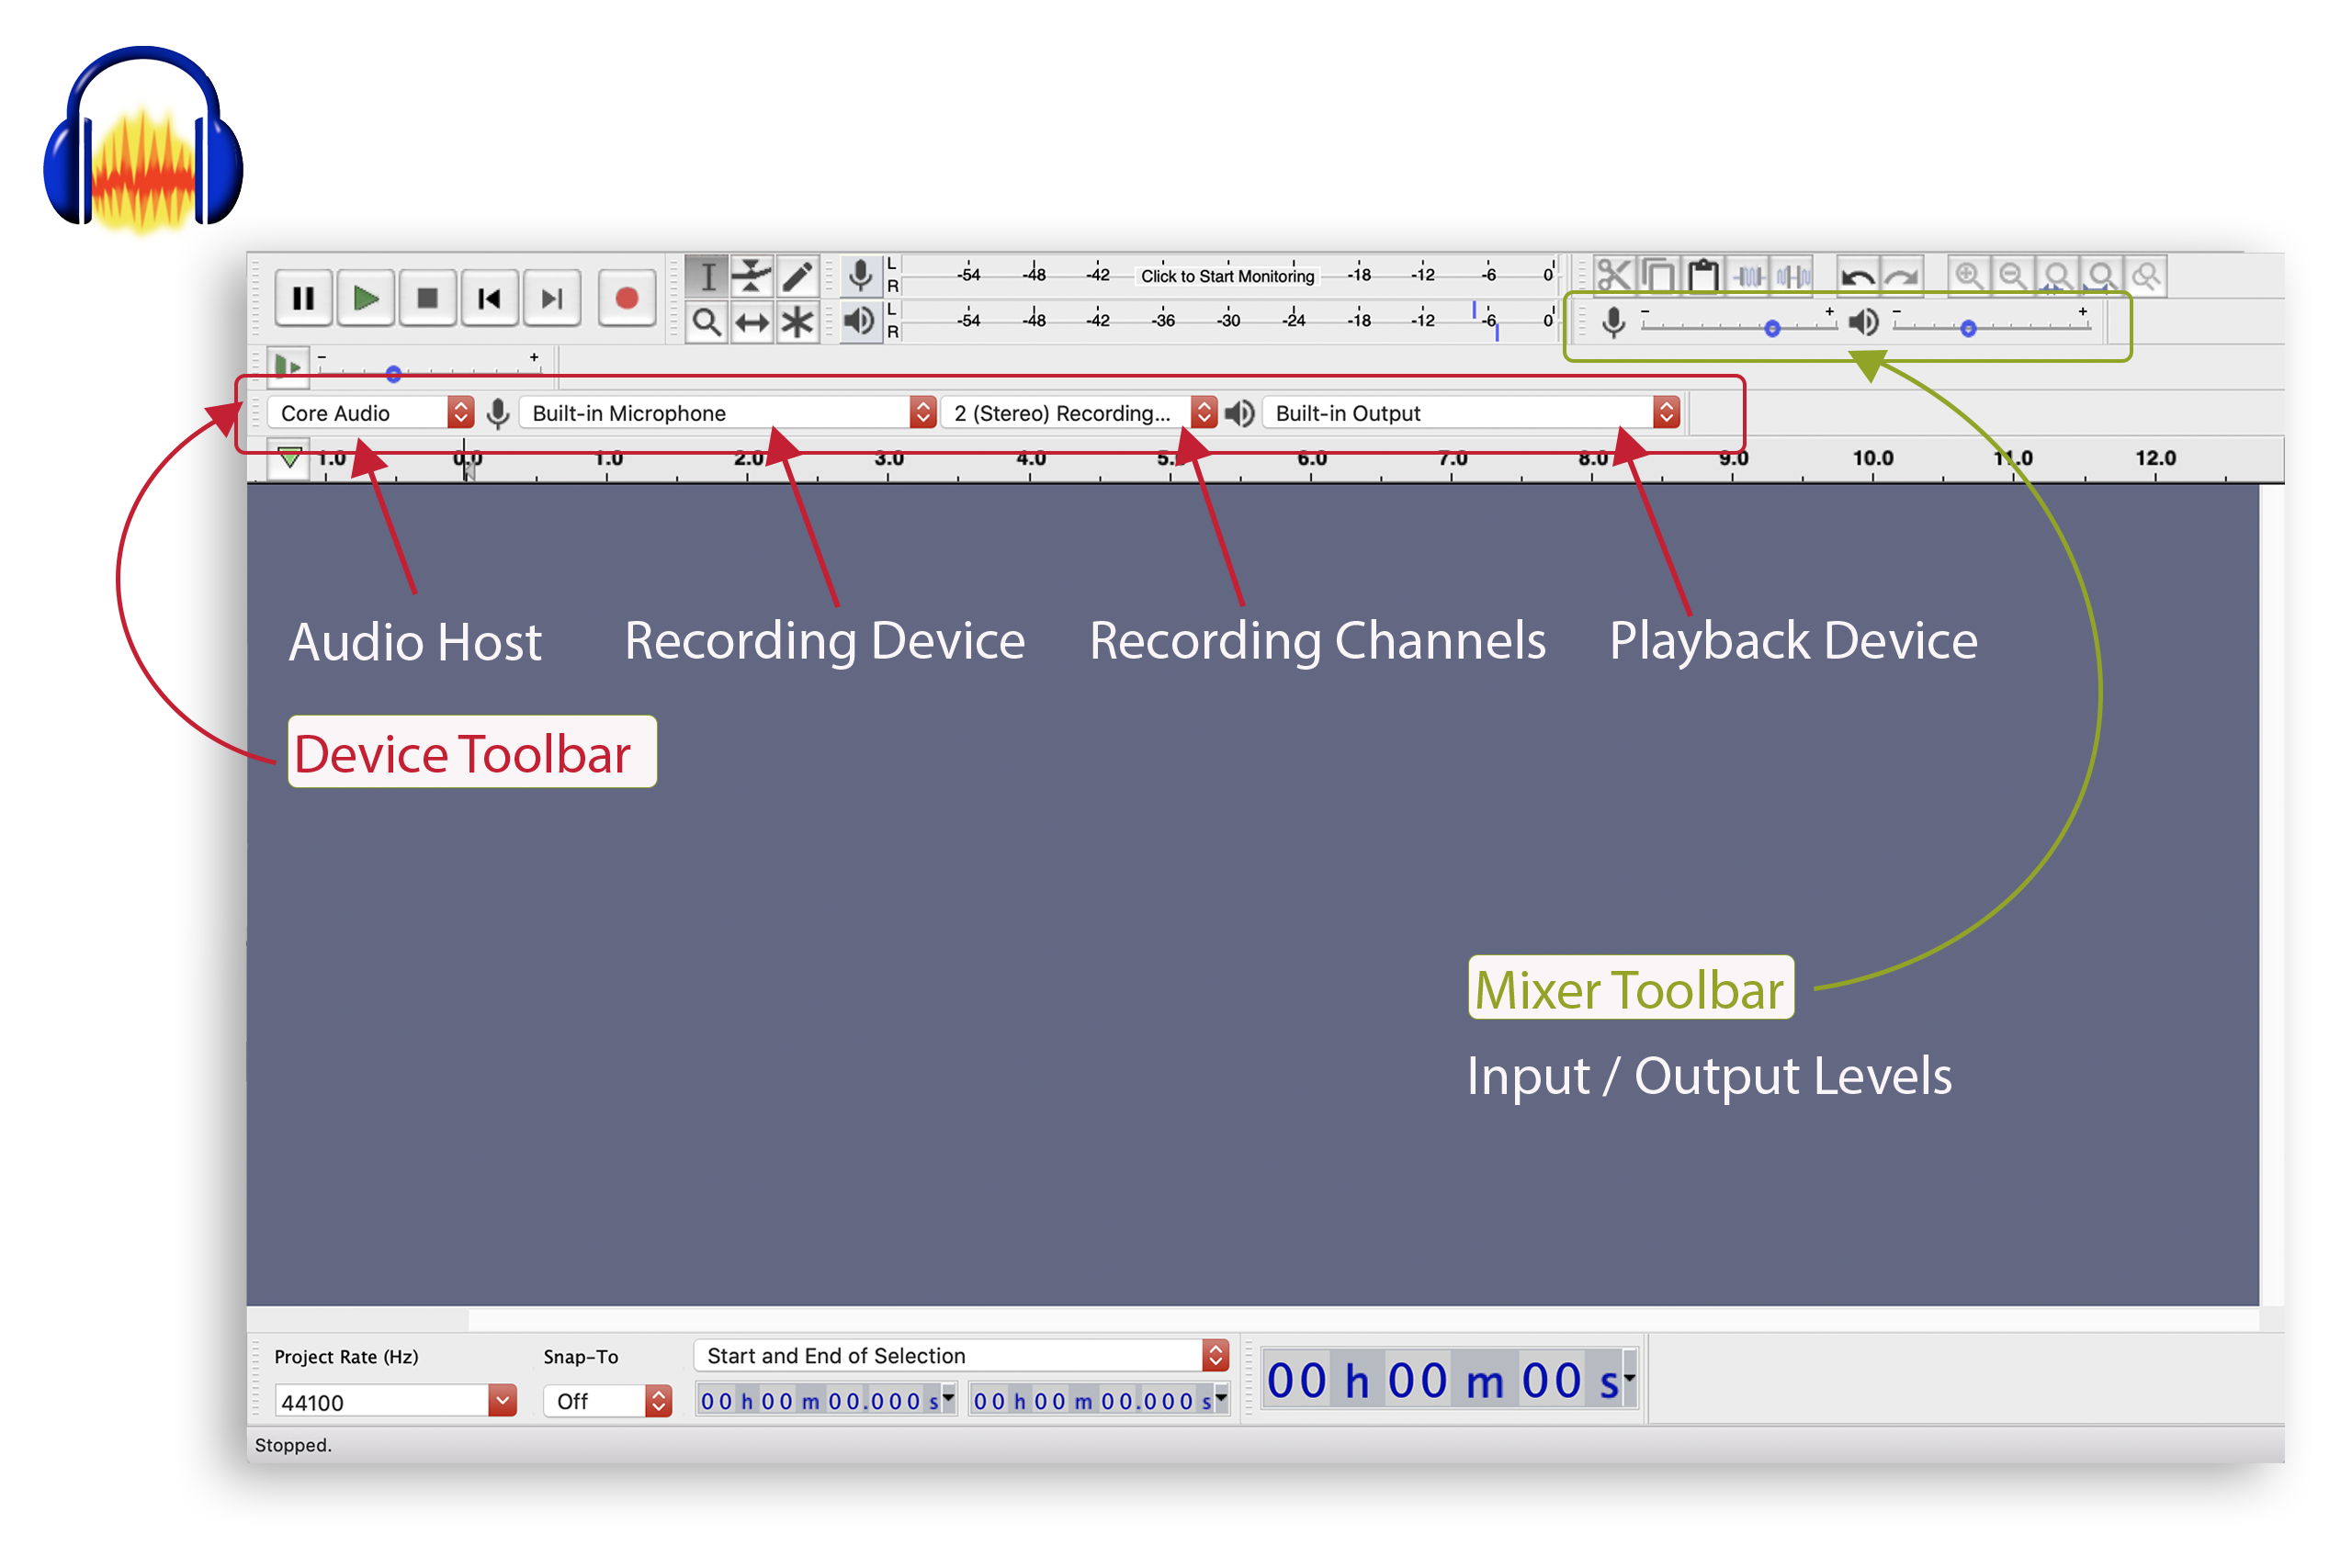
On the left hand side of the track, you will notice the track’s default sample and bit rate shown, gain controls, and an Audio Track Menu, where you can opt to change the file settings, and change the waveform to a spectrometer view, or display both.
Tutorial Illustration 
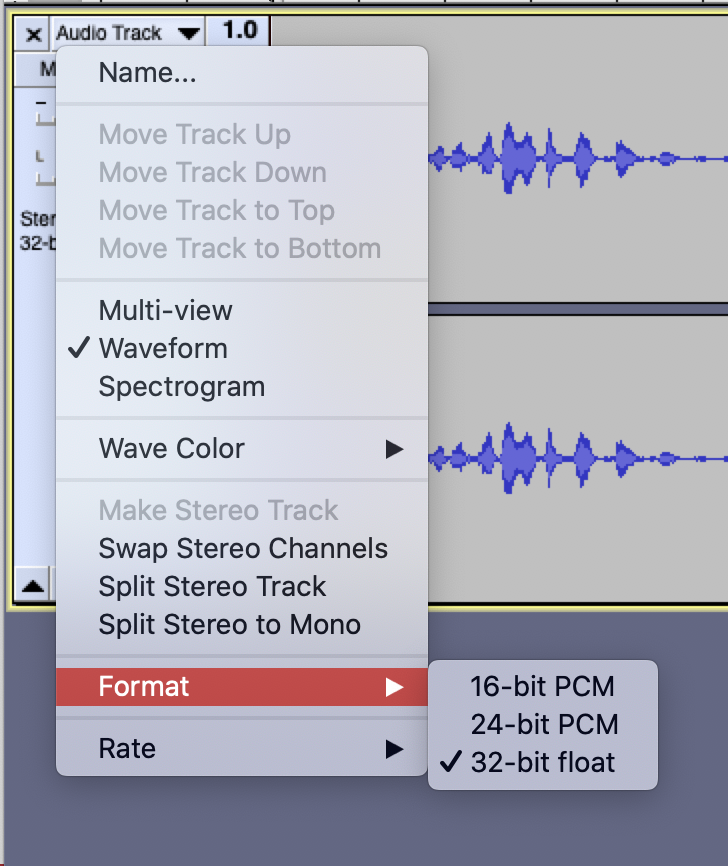
You can change the format of your recording within the Audio Track Menu.

Noise Reduction


The Noise Reduction effect is ideal for removing noise that is constant in the background of a recording, such as fans, tape hiss, or humming. It will not work for removing other background noise such as talking or music.

When the signal (i.e. the voice or the music) is much louder and clearer than the noise, this effect works well. It will not work as well if the noise is very prominent, when the type of noise varies, or when the signal and noise are equal in strength.

Removing noise is a two-step process:

1) Select a portion of your sound which contains only noise, and none of the signal that you intended to record.  From the Effect Menu select Noise Removal” and choose Get Profile. Audacity learns from this selection what the noise sounds like, so that it can filter that noise out in Step 2.


Noise Reduction


2) After you “Get Noise Profile” select the entire audio track, or the entire portion of audio to which you want to apply the Noise Removal Effect. Return to the Effects Menu and select Noise Removal again, as you did in step 1. Begin with the default settings and chooseRemove Noise” this time.

If the effect was too moderate to make a difference, or applied too strongly resulting in a lot of distortion, you can use “Undo” from the Tools Toolbar (Ctl + Z) to undo the effect and try again, by decreasing or increasing the default settings.

This process will take a few seconds, or longer, depending on how much of the audio track you’ve selected.


”Save

In the File Menu Save Project enables you to save your work as an Audacity Project File or .AUP file.

Audacity projects are not intended to be read by other programs, but rather to save a work in progress for Audacity. This type of file is  extremely fast to load and save within Audacity.

Use this option if you are not finished editing your work and would like to return to it later.

If you are finished working on your project, and would like to use the audio file in another program, or share it with others, choose to Export your file instead.

”Export

Use the Export function when you want to save your completed work for use in other audio programs or players, and share with others. Exporting to MP3 or WAV will mixdown a multitrack session into a single audio file, and save any edits you’ve made to a playable track.

To export a file go to File > Export.  Choose if you want to export to a compressed MP3 format, or an uncompressed WAV file.  You can choose the quality of your exported file in the “Save” dialogue box.

To export only a single track from a multi-track session, or to export a selected part of a track, you can use the “Export Selection” option further down in this same menu.

Make sure to listen to your exported audio track, or “Save As” an .AUP file before closing Audacity, so that you don’t lose your work before confirming that your exported track sounds exactly as you intended it to sound.